Mastering Guitar Solos
Mastering Guitar Solos: The Complete Guide to Position, Phrasing, Expression, and Advanced Construction
Whether you’ve been playing for two years or twenty, the guitar solo remains one of the most personal, expressive, and technically demanding things you can do on the instrument. A great solo doesn’t just show off speed or technique — it tells a story. It builds tension, releases it, breathes, surprises, and resolves. It makes the listener feel something.
This guide breaks down every major element of solo mastery into four core pillars: Position & Fretboard Control, Phrasing Techniques, Expression Techniques, and Advanced Solo Construction. Work through each section systematically, and you’ll have the tools to create solos that are not just technically competent, but genuinely musical.
Part One: Position & Fretboard Control
Before you can phrase beautifully or express deeply, you need to own the fretboard. That means knowing where you are at all times, being able to move freely across the neck, and understanding how scale shapes, chord shapes, and linear patterns connect. Let’s break down the five essential approaches to fretboard control.

Mastering Guitar Solos
1. Box-Position Soloing: Creativity Through Constraint
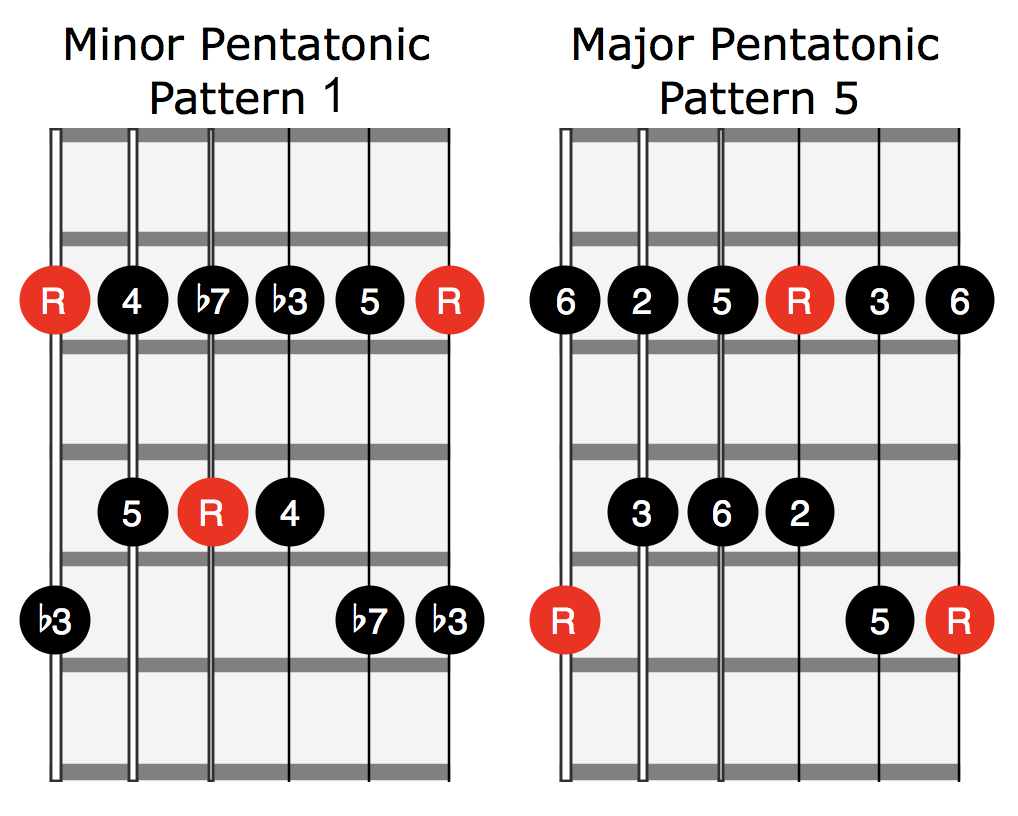
The pentatonic box position is where almost every guitarist begins their soloing journey — and for good reason. The minor pentatonic “box 1” shape (rooted at the low E string) is intuitive, forgiving, and sits under the fingers beautifully. But here’s the trap: most players get stuck there. They run the same licks up and down the same five frets until their solos sound identical on every song.
The solution isn’t to abandon the box — it’s to exploit it creatively.
What box-position soloing really teaches is phrasing within constraint. When you’re locked inside a single pentatonic or modal shape, you’re forced to find variation through rhythm, dynamics, bends, and space rather than simply moving to a different part of the neck. This is an enormously valuable discipline.
How to practice it: Set a timer for five minutes. Play over a backing track using only one pentatonic box — no leaving it, no matter what. Your first two minutes will feel stale. By minutes three through five, you’ll start finding melodic ideas you’ve never played before, because you’re being forced to squeeze creativity out of a limited space.
Try this with modal shapes too. Staying inside a single Dorian or Mixolydian shape over a chord progression forces you to hear the mode’s characteristic notes (the major 6th in Dorian, the flat 7th in Mixolydian) more vividly.
Key insight: The best blues and rock soloists — B.B. King, Eric Clapton in his Bluesbreaker era — built careers largely out of one or two positions. The box isn’t a limitation. It’s a home base.
2. Three-Notes-Per-String Patterns: Speed, Fluidity, and Linear Thinking
Once you’ve internalized your box positions, three-notes-per-string (3NPS) patterns open up an entirely different dimension of playing. Instead of the asymmetric string groupings of pentatonic shapes, 3NPS layouts place exactly three notes on every string, creating long, horizontal runs across the neck.
Why 3NPS is so powerful for speed and fluidity: The mechanical consistency of three notes per string makes alternate picking (or economy picking) dramatically more efficient. Your picking hand develops a reliable rhythm — down, up, down, change string, down, up, down — rather than adjusting to irregular groupings. This is how players like John Petrucci, Paul Gilbert, and Steve Morse achieve those cascading, fluid scale runs.
Beyond speed: 3NPS patterns also force you to hear the entire scale in a linear fashion rather than vertically. When you run a G major scale in 3NPS, you travel from the 3rd fret of the low E all the way up to the high registers in one connected motion. This builds a mental map of the scale across the entire neck, not just within one position.
Practice tip: Start slow. Really slow. Run a single 3NPS pattern (try the Ionian/major scale starting on the low E) at 60 BPM with a metronome, making sure each note rings cleanly. Increase by 5 BPM only when it feels effortless. Sloppy speed is worthless. Clean speed at 120 BPM is worth everything.
Transition into solos: 3NPS runs sound best when they’re used as connecting tissue between more stationary phrases — a burst of ascending or descending motion that launches you into a new position on the neck.
3. CAGED System Targeting: Connecting Chords to Solo Phrases
The CAGED system (named after the five open chord shapes — C, A, G, E, D — that repeat up the neck) is one of the most powerful frameworks for understanding how chords and scales relate across the entire fretboard. For lead playing, it transforms the way you think about soloing over chord changes.
The core idea: Every chord you play has a CAGED shape underneath it. When you’re soloing, identifying the CAGED shape of the chord being played tells you exactly which chord tones are nearby — and those chord tones are the notes that will sound strongest over that chord.
For example, if the song is in A major and you’re in the “A shape” CAGED position, the root (A), third (C#), and fifth (E) are clearly mapped beneath your fingers. You don’t have to guess which notes to land on — you can see the chord skeleton inside your scale shape.
Why this matters in practice: Many guitarists solo by scale shape alone, which often leads to meandering lines that don’t track the harmony. CAGED targeting forces you to solo with the chords, giving your lines a sense of harmonic purpose and direction.
How to start: Take a simple I-IV-V progression (say, G-C-D). For each chord change, identify the CAGED shape at your current position and consciously land on a chord tone (root, 3rd, or 5th) on the downbeat. Just this one practice — landing on chord tones — will make your solos sound dramatically more intentional.
4. Horizontal Soloing: Breaking Free from the Vertical Box
Most beginners think about the guitar vertically — moving across strings within a fixed fret range. Horizontal soloing flips that completely, moving along one or two strings across the full length of the neck.
The sound of horizontal playing is distinctive and vocal. Think of a violinist, cellist, or horn player — their melodic lines don’t jump laterally the way a guitarist’s do. They slide, extend, and travel in one continuous direction. Horizontal guitar playing mimics this quality and gives solos a lyrical, singing quality that purely vertical playing often lacks.
Practical approach: Choose a single string — the B string is a great place to start. Map out a major or minor scale position by position along that one string (you’ll use three or four positions on one string to cover a full octave and beyond). Practice creating melodic phrases that travel along the string, using slides to connect positions smoothly.
Two-string horizontal playing is equally powerful. The G and B strings together cover a wide range and are where most melodic activity in soloing occurs. Learning to move fluidly across several fret positions on just these two strings gives you an almost limitless melodic vocabulary.
Real-world example: Slash’s solo in “November Rain” is a masterclass in horizontal movement. Rather than camping in one box position, the solo travels the length of the neck, creating a sweeping, cinematic quality.
5. Octave Mapping: Unifying the Solo Across the Neck
Octave mapping is the practice of taking a melodic idea and repeating it in a different octave — higher or lower on the neck. It’s one of the most elegant tools for creating a sense of coherence and unity in a solo.
Why it works musically: When a listener hears the same melody appear in a higher or lower register, the brain recognizes it as a variation of something familiar. It creates a satisfying sense of continuity — the feeling that the solo is a unified statement rather than a series of disconnected licks.
How to map octaves on guitar: On a standard-tuned guitar, moving up two strings and back two frets (from string 6 to string 4, for example) moves you up one octave. Moving up two strings and forward three frets (when crossing the G-B string boundary) does the same. Memorize these interval relationships until they’re automatic.
In practice: Take a simple three- or four-note melodic fragment — say, the opening phrase of your solo. Play it in your starting position. Then play it again one octave higher. Then, if the range allows, one octave higher still. This technique immediately makes even simple ideas sound intentional and compositional.
The Complete Guide to Position, Phrasing, Expression, and Advanced Construction
Part Two: Phrasing Techniques
Phrasing is the difference between a guitarist who plays notes and a guitarist who plays music. Technical facility means nothing without the ability to organize notes into meaningful, emotionally coherent statements. These five phrasing techniques are the foundation of expressive solo construction.
1. Call-and-Response Phrasing: The Language of Music
Call-and-response is one of the oldest musical structures in human history — it’s the backbone of African music, gospel, blues, jazz, and rock. In guitar soloing, it means playing one phrase (the “call”) and then answering it (the “response”) rhythmically, melodically, or dynamically.
Why it’s so powerful: Call-and-response creates an immediate sense of structure and dialogue. Even a listener with no musical training hears it as a conversation — a question followed by an answer. This makes solos feel purposeful rather than meandering.
How to practice: Play a simple four-beat phrase. Then consciously think: “What is the answer to that phrase?” The response can mirror the rhythm but change the melody. It can answer higher or lower. It can answer with silence followed by a single note. The possibilities are endless — but the key is that every phrase has an intentional counterpart.
Listen to: Stevie Ray Vaughan is a master of this. In “Pride and Joy” and “Texas Flood,” his soloing is a constant conversation — a stinging bend answered by a low growl, a high phrase answered by a deep groove.
2. Motif Development: Small Ideas, Big Impact
A motif is a small melodic or rhythmic idea — sometimes just two or three notes — that forms the seed of an entire solo. The art of motif development is taking that seed and gradually evolving it throughout the solo, keeping it recognizable while keeping it fresh.
How motif development works in practice: Introduce your motif clearly at the start of the solo. Then, on the next iteration, change one element — the rhythm, the starting note, the ending note, or the articulation (try it with a bend instead of a straight note). On the next iteration, change something else. By the end of the solo, your motif may look quite different from where it started — but the listener has been on a journey with it.
Why this creates great solos: It gives the solo a sense of organic growth and narrative arc. The listener feels they’re experiencing a development, not just a sequence of unrelated licks.
3. Space and Rests: What You Don’t Play
Miles Davis famously said that the notes you don’t play are just as important as the notes you do. For guitarists — especially rock and blues players — this is hard to internalize. The instinct is always to fill the space.
Resist it. Silence is powerful. A held note followed by two beats of silence creates more tension than two beats of fast picking. A phrase that ends abruptly and lets the chord ring underneath it breathes in a way that relentless playing never can.
Practical exercise: Record yourself soloing. Then listen back and mark every moment where you’re playing continuously for more than four beats without a rest. Force yourself to cut at least half of those runs short. The spaces you create will transform the feel of the solo entirely.
Think of rests as punctuation: A rest is a comma, a period, a breath mark. Great solos have sentences, paragraphs, and pauses — not one endless run-on sentence.
4. Rhythmic Displacement: Surprise the Listener’s Ear
Rhythmic displacement means starting a phrase off the expected beat — beginning on the “and” of beat 2 instead of beat 1, or pushing a lick to land on the upbeat instead of the downbeat. It creates a sense of momentum, surprise, and rhythmic sophistication.
Why it works: Most listeners (consciously or not) anticipate that phrases will begin on strong beats. When you start a phrase on a weak beat, the listener’s ear suddenly leans in — there’s a momentary tension as the phrase “catches up” with the rhythm. When it resolves, it’s deeply satisfying.
How to practice displacement: Take a lick you already know. Play it starting on beat 1. Then play it starting on the “and” of beat 1 (the upbeat). Then starting on beat 2. Notice how dramatically the feel changes even though the notes are identical.
Listen to: Jimi Hendrix was a genius of rhythmic displacement. His phrases constantly floated around the beat, creating that hypnotic, swinging quality that made him sound unlike anyone else.
5. Question/Answer Dynamics: Soft Setup, Loud Release
This technique is the dynamic version of call-and-response. The “question” phrase is played softer, lower in pitch, more hesitant in character. The “answer” phrase is louder, higher, more aggressive — a release of the tension the question built.
The dynamic arc this creates is deeply satisfying to the human ear because it mirrors the way we experience tension and release in all aspects of life. The soft question creates anticipation; the loud answer delivers a cathartic release.
How to build this into your playing: Practice consciously varying your picking attack. On “question” phrases, pick lightly and stay in the lower registers. On “answer” phrases, dig in hard and climb the neck. The contrast between the two is the whole point.
Part Three: Expression Techniques
Expression is the soul of guitar soloing. Without it, you’re playing notes. With it, you’re making the guitar speak. These five techniques are the core vocabulary of guitar expressiveness.
1. String Bending: The Human Voice on Guitar
More than any other technique, string bending is what makes the guitar sound like a human voice. The ability to bend a note up by a quarter step, a half step, a whole step — or to pre-bend and release — gives the guitar an almost vocal quality that no other instrument can replicate quite the same way.
Quarter-step bends (a subtle, blues-inflected push just slightly sharp) are the most emotionally raw. They live in that ambiguous space between two notes — the “blue note” quality that defines blues and soul guitar.
Half-step and whole-step bends are the workhorses of rock and blues soloing. A whole-step bend takes a note up to the pitch two frets higher; a half-step bend takes it one fret up. These create the signature “crying” quality of classic rock guitar.
Pre-bends (bending the string before picking, then picking and releasing back down) create a falling, melancholy effect — like a voice breaking.
How to develop bending accuracy: Use your ears as the guide. When you bend to a target pitch, know exactly what pitch you’re aiming for. Play the target note fretted, then match it with a bend from a lower fret. Record yourself bending and listen back critically. Out-of-tune bends are the number one giveaway of an underdeveloped soloist.
2. Vibrato Control: Your Expressive Signature
If bending is the voice, vibrato is its character. Vibrato — the subtle, rhythmic oscillation of a note’s pitch — is perhaps the most personal expression technique a guitarist has. Your vibrato is your fingerprint.
Wide vibrato (a large pitch oscillation) sounds dramatic, vocal, and emotional — think B.B. King or Carlos Santana. Narrow vibrato (a subtle shimmer) is more refined and classical in character. Slow vibrato builds toward a heartfelt intensity; fast vibrato creates urgency or anxiety.
The key to great vibrato is consistency and control. Random, wobbly vibrato sounds uncertain. Deliberate, rhythmic vibrato — where the oscillation locks in with the pulse of the music — sounds commanding and confident.
How to develop it: Practice sustaining a single note for four full beats, applying vibrato from the moment you pick it. Keep the oscillation even and rhythmically regular. Experiment with different widths and speeds, always listening critically to whether your vibrato is enhancing or undermining the note.
3. Slides: The Glue Between Phrases
Slides — picking a note and sliding up or down to a target pitch — are the connective tissue of great guitar soloing. They smooth out the transitions between phrases, add a sense of flow and momentum, and can be expressive tools in their own right.
Slides into a note (sliding up from an indeterminate lower pitch) create anticipation and momentum. Slides out of a note(sliding away after picking) add a trailing, ghostly quality. Defined slides (sliding from one specific fret to another) are melodic transitions that can replace position shifts almost entirely.
Horizontal soloing (covered earlier) relies heavily on slides to move between positions along a single string. But slides work just as well in vertical playing — sliding into a bent note, for instance, creates a deeply bluesy, vocal effect.
4. Legato Playing: Fluid, Flowing Lines
Legato playing — hammer-ons, pull-offs, and combinations of the two — produces a smooth, flowing quality that alternate picking alone can’t replicate. When done well, legato playing sounds like water running downhill: effortless, connected, uninterrupted.
Hammer-ons (fretting a note without picking, using only the fretting hand) and pull-offs (pulling the finger off a fretted note to sound a lower one) are the building blocks. Legato runs combine the two in long chains — three or four hammer-ons followed by three or four pull-offs — creating long, fluid phrases from a single pick stroke.
The key to clean legato is finger strength and precision in the fretting hand. Each hammer-on and pull-off must be as loud and clear as a picked note. Practice slowly, ensuring every note in a legato phrase has equal volume and clarity.
Listen to: Joe Satriani and Allan Holdsworth are the two definitive legato masters. Holdsworth in particular played almost exclusively with legato, creating phrases that sounded like a saxophone rather than a guitar.
5. Double-Stops: Thickness, Blues Grit, and Rock Power
A double-stop is two notes played simultaneously — typically a harmonized interval of a third, fourth, or sixth. Double-stops instantly thicken the texture of a solo, adding a sense of strength and harmonic richness that single-note lines can’t achieve.
In blues playing, double-stops (usually thirds or fourths) create that grinding, gritty texture associated with Muddy Waters, Chuck Berry, and the Rolling Stones. In rock, they add crunch and aggression — think of the iconic Chuck Berry “riff-as-double-stop” approach that influenced virtually every rock guitarist who followed.
Practice tip: Take any single-note phrase you already know and harmonize every note with its diatonic third (the note three scale degrees above it). Play the phrase again as double-stops. Notice how dramatically the character of the phrase changes.
Part Four: Advanced Solo Construction
The techniques above give you the vocabulary. Now let’s talk about composition — how to put the pieces together to build solos that have shape, intent, and emotional arc.
1. Chord-Tone Targeting: Harmonic Precision
Chord-tone targeting means consciously choosing to land on the root, third, fifth, or seventh of whatever chord is currently being played — especially on strong beats or at the end of phrases. This single technique separates harmonically aware soloists from those who just run scales.
Why it matters: Any note in the scale you’re using will technically “work” over a chord, but some notes speak more clearly than others. The root grounds the phrase. The third defines the chord’s major or minor quality. The fifth adds stability. The seventh adds sophistication and color.
How to develop this skill: Take a simple chord progression. Before you play anything, sing or hear the chord tones in your head for each chord. Then, as you solo, make a deliberate effort to land on one of those tones — even if the rest of the phrase is scalar. Just landing on the right note at the right moment will instantly make your solos sound more musical and harmonically fluent.
2. Modal Interchange Phrasing: Color Shifts and Emotional Contrast
Modal interchange means temporarily borrowing from a parallel mode — using notes from a different mode built on the same root. Over an A minor chord, you might briefly play phrases from A Dorian (which has a major 6th), then shift to A Phrygian (which has a darkened flat 2nd), then back to pure A minor (Aeolian).
The emotional effect is a dramatic shift in color — like changing the lighting in a room from warm amber to cold blue. Each mode has a distinct emotional character: Dorian is soulful and bright, Phrygian is dark and exotic, Mixolydian is open and rock-inflected.
How to start exploring modal interchange: Pick one backing chord (A minor works perfectly) and learn to hear the characteristic note of at least two parallel modes. In Dorian, it’s the F# (major 6th). In Phrygian, it’s the Bb (flat 2nd). Practice phrases that use these characteristic notes clearly, then switch between them mid-solo and notice how the emotional quality changes.
3. Outside Playing: Dissonance and Resolution
Outside playing means deliberately stepping outside the scale or key — using dissonant, “wrong” notes — before resolving back to a chord tone or scale tone. When done with confidence and direction, outside playing creates intense tension that makes the resolution feel euphoric.
The key to outside playing is not the outside note itself but the resolution. The ear will tolerate almost any level of dissonance if it resolves convincingly. A half-step chromatic slide into a chord tone. A whole-step bend from a note that clashes with the chord, resolving to the note one fret up. An outside run that lands cleanly on the root.
A simple entry point: Play a phrase that ends one fret below your target chord tone. The note one fret below is dissonant, outside the key — but if you resolve it upward quickly, the tension and release is thrilling. This is the chromatic approach tone, and it’s the safest entry into outside playing.
As you develop: Try playing entire short phrases a half step above or below the key, then sliding back in. The effect is jarring and exciting — and it’s a hallmark of bebop-influenced rock and jazz-fusion players like Allan Holdsworth, John McLaughlin, and Scott Henderson.
4. Sequencing: Patterns That Build Momentum
A sequence is a musical pattern that repeats through the notes of a scale, descending or ascending by one scale degree each repetition. Instead of simply running a scale from bottom to top, you run a pattern through it — groups of three, four, or six notes that repeat in a consistent intervallic relationship.
Example — a three-note descending sequence in G major: Play notes 1-2-3, then 2-3-4, then 3-4-5, and so on. Each group of three starts one scale degree lower than the last, creating a cascading, waterfall-like effect.
Why sequencing sounds so powerful: The brain latches onto the repeating pattern immediately and begins to anticipate it. As the sequence descends (or ascends) through the scale, each repetition creates a small satisfying confirmation. Then, when the sequence breaks — when you stop sequencing and play something unpredictable — the contrast is electrifying.
Practice tip: Learn sequences in groups of 3, 4, and 6, both ascending and descending. Apply them in both pentatonic and seven-note scales. Learn to enter a sequence mid-solo and exit it cleanly.
5. Dynamic Contour Building: The Arc of a Great Solo
A great guitar solo is not a flat sequence of equally exciting moments — it has a shape. It builds. It climbs toward a climax. It releases. It may build again. This deliberate shaping of intensity over time is called dynamic contour, and it’s the difference between a solo that’s merely impressive and one that’s genuinely moving.
The classic solo arc: Start relatively simply, low in pitch and dynamic. Build through increasingly complex phrases, bends, and higher notes. Reach a peak — the highest note, the most intense bend, the fastest passage — and then release, resolving to something definitive and clear.
How to construct contour deliberately: Think of your solo in three sections. The intro (first third): establish a motif, stay restrained, let the listener settle in. The build (middle third): develop the motif, move up the neck, add intensity through volume and vibrato. The climax and release (final third): peak pitch and intensity, then a powerful, resolved ending.
The most common solo mistake is front-loading all the excitement — playing your best lick in the first four bars and having nowhere to go. Save your peak for two-thirds of the way through, and you’ll always have room to build toward it.
Putting It All Together: Practicing With Intent
Having read through these twenty techniques, the most important question is: how do you actually practice them?
The answer is deliberate, focused practice in isolated “silos.” Each technique above is a separate practice topic. Don’t try to apply all twenty in one practice session. Instead, choose one technique per session and spend 20-30 minutes exclusively on that skill.
A weekly practice structure might look like this:
Monday: Box-position soloing — play over a backing track using only one pentatonic box for 20 minutes.
Tuesday: Call-and-response phrasing — every phrase you play must have a deliberate answer.
Wednesday: Chord-tone targeting — practice the I-IV-V progression, landing on chord tones at every change.
Thursday: Vibrato control — sustain single notes with deliberate, rhythmic vibrato for 10 minutes, then apply in solo context.
Friday: Dynamic contour — record a full solo and analyze its arc afterward. Did it build? Did it peak? Did it resolve?
Weekend: Integration session — solo freely over a backing track, drawing on whatever techniques feel natural. Don’t think analytically. Just play.
The goal of isolated practice is to move each technique from conscious to unconscious application. Once it’s unconscious, it becomes part of your natural voice.
The Solo as a Statement
Every technique in this guide ultimately serves one purpose: giving you the freedom and vocabulary to make a musical statement. The fretboard knowledge gives you where to play. The phrasing gives you structure. The expression gives you emotion. The advanced construction gives you shape and intent.
But techniques are not music. Music happens when all of these elements dissolve into something personal — when you stop thinking about CAGED shapes or three-notes-per-string patterns and start speaking through the guitar. That’s the destination every great soloist is working toward.
The path there is practice, patience, and a willingness to listen to yourself critically. Record your solos. Transcribe solos from players you love. Steal shamelessly, then transform what you steal. Play with other musicians. Play alone. Play slowly. Play in the dark if you have to.
The guitar solo is one of the great expressive vehicles in all of popular music. Master the tools in this guide, and you’ll have everything you need to find your own voice within it.