Barre Chords Guide
Mastering Barre Chords: The Complete Guide to Clean Technique, Strength, and Pain-Free Practice
Barre chords are one of the biggest turning points in learning guitar. Once you can play them cleanly, the neck opens up. You are no longer limited to a handful of open shapes in a few easy keys. Instead, you can move the same chord forms anywhere on the fretboard and play in virtually any key.
That freedom is exactly why barre chords matter so much – and why so many beginners get stuck on them.
If barre chords currently feel impossible, that does not mean you are bad at guitar. In most cases, the problem is not lack of talent or even lack of strength. It is usually a mix of unfamiliar mechanics, poor hand positioning, and starting with shapes that are harder than they need to be. Many players try to brute-force their way through buzzing strings and hand pain, which only builds tension and slows progress.
This guide is designed to fix that.
You will learn how barre chords actually work, how to position your hand for clean notes, how to build E-shape and A-shape barre chords, how to avoid pain, and how to practise them in a way that produces real progress. If you follow the sequence below, you will build the right technique first, then the strength and endurance to make barre chords feel natural.
What you’ll learn
- How to place your index finger correctly for a clean barre
- Where your thumb, wrist, and arm should go for maximum leverage
- How E-shape and A-shape barre chords work
- The most common barre chord mistakes and how to fix them fast
- Step-by-step exercises to build strength and consistency
- Pain-free practice strategies to avoid injury
- A realistic timeline for mastering barre chords
Why barre chords feel so hard at first
Barre chords are difficult because they ask your fretting hand to do something completely new. In open chords, the nut helps hold some strings in place. In a barre chord, your index finger replaces the nut, pressing multiple strings across a single fret while your other fingers build the chord shape above it.
That creates three immediate challenges:
- Your hand has not learned the movement yet. Barre chords require a specific combination of finger angle, thumb support, wrist alignment, and arm pressure.
- Most beginners use too much force. The instinct is to squeeze harder when notes buzz, but that usually makes the chord worse.
- Many players start at the hardest point. The classic F major at the 1st fret is one of the toughest beginner barre chords because the string tension is highest there.
The good news is that barre chords become much easier once you understand that they are more about leverage and positioning than raw strength.
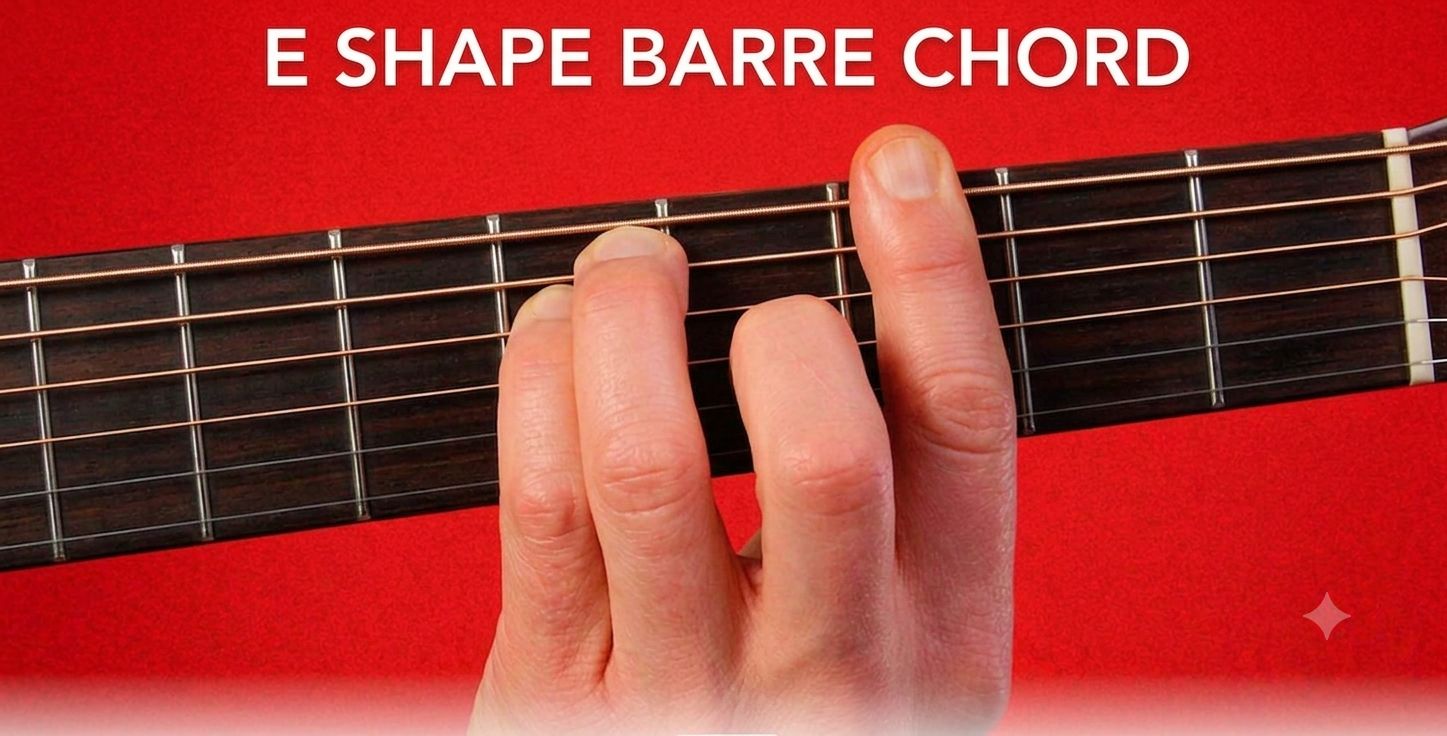
E Shape Barre Chord
The foundation of a clean barre chord
Before learning full chord shapes, you need to understand the mechanics of the barre itself. Most problems happen before the other fingers even join the shape.
Index finger placement
Your index finger is the core of the chord. If it is placed poorly, everything above it will fight against you.
Roll onto the bony edge
Do not press with the flat, soft underside of the finger. That part has creases and softer tissue, which often causes dead notes and inconsistent contact. Instead, rotate the finger slightly toward the headstock so the harder, bony edge makes contact with the strings.
This small adjustment is one of the biggest breakthroughs for most players.
Keep the finger as straight as possible
If your index finger bends at the middle joint, the middle strings often stop ringing properly. A straighter finger creates more even pressure across the fret. If your finger naturally curves, experiment with your wrist and elbow angle until the barre lies flatter.
Sit close to the fret wire
Place the barre just behind the fret wire, not in the middle of the fret space. This reduces the amount of pressure needed and helps the string ring more clearly. When beginners press too far back, they often compensate by squeezing harder.
Use a slight diagonal angle
Your index finger does not have to be perfectly parallel to the fret. In fact, a slight diagonal often works better because it matches the natural shape of the hand. The tip can help press the lower strings while the base of the finger supports the higher strings more efficiently.
Thumb placement
Thumb position is one of the most overlooked parts of barre chord technique.
Place your thumb roughly behind the neck, around the middle, and generally opposite the index finger. This creates a stable counter-pressure. Avoid wrapping the thumb over the top of the neck when learning full barre chords, because that usually twists the wrist and reduces leverage.
Think of the thumb and index finger as forming a balanced clamp, not a crushing grip. The thumb supports the chord. It should not be doing all the work.
Wrist and arm alignment
A clean barre chord depends on the whole arm, not just the hand.
Keep the wrist reasonably straight and relaxed. A dramatic bend inward creates tension and makes the index finger weaker, not stronger. Let the arm hang naturally, then bring the hand to the neck with minimal strain.
Most importantly, use a little arm weight to help press the strings. A good barre does not come from finger strength alone. It comes from coordinated support between the finger, thumb, wrist, and forearm.
The golden rule of barre chords: less force, better results
One of the biggest mistakes beginners make is assuming that buzzing means they need to squeeze harder. Usually, the opposite is true.
Excess pressure causes:
- Faster hand fatigue
- More wrist and thumb pain
- Less precision in the other fingers
- More overall tension, which often makes buzzing worse
If a barre chord is not clean, first adjust:
- Finger angle
- Distance from the fret wire
- Thumb position
- Wrist alignment
- Use of arm weight
Only after checking those should you think about adding pressure. In most cases, a better position solves more than a stronger grip.
Barre Chords Guide
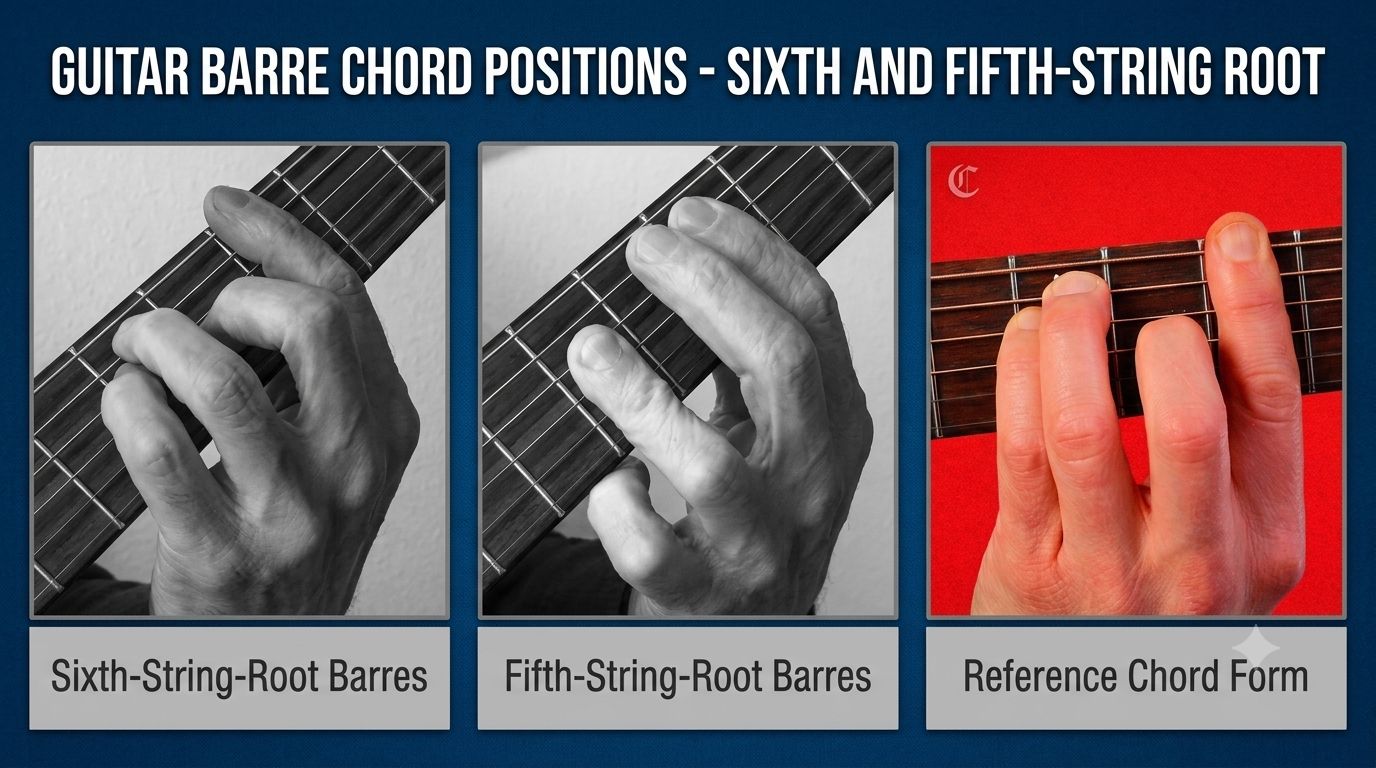
The two essential barre chord shapes
Almost all standard barre chords come from two familiar open-chord forms:
- E-shape barre chords
- A-shape barre chords
Once you understand these two systems, you can play major, minor, and seventh chords all over the neck.
E-shape barre chords
The E-shape barre chord is based on the open E major shape. Here, the root note sits on the 6th string, which means the name of the chord is determined by the note under your index finger on the low E string.
How the E-shape works
To build the shape:
- Index finger: bars all 6 strings at the target fret
- Middle finger: goes on string 3, one fret higher than the barre
- Ring finger: goes on string 5, two frets higher
- Pinky: goes on string 4, two frets higher
Example: F major barre chord
The famous F major chord is simply an E-shape moved to the 1st fret.
| String | Note | Finger | Fret |
|---|---|---|---|
| 6 | F | Index barre | 1 |
| 5 | C | Ring | 3 |
| 4 | F | Pinky | 3 |
| 3 | A | Middle | 2 |
| 2 | C | Index barre | 1 |
| 1 | F | Index barre | 1 |
Common E-shape variations
| Chord type | Change from major shape | Example |
|---|---|---|
| Minor | Remove middle finger | Fm |
| Dominant 7 | Reconfigure upper fingers | F7 |
| Major 7 | Add maj7 colour tone | Fmaj7 |
| Minor 7 | Minor shape plus 7th | Fm7 |
| Sus2 | Replace 3rd with 2nd | Fsus2 |
| Sus4 | Replace 3rd with 4th | Fsus4 |
Best place to start
Do not begin at F major if you can avoid it. Start this shape around the 5th fret, where the strings feel looser and the fret spacing is friendlier. Once the shape rings clearly there, gradually move down toward the 1st fret.
That one adjustment alone can make barre chords feel dramatically more achievable.
A-shape barre chords
The A-shape barre chord comes from the open A major form. In this version, the root note sits on the 5th string, and the low 6th string is usually muted or avoided.
How the A-shape works
To build the shape:
- Index finger: bars strings 1 to 5 at the chosen fret
- Low E string: muted or not played
- Other fingers: either use three separate fingers or a compact mini-barre
Beginner-friendly fingering
For most beginners, the cleanest version is:
- Middle finger: string 2
- Ring finger: string 3
- Pinky: string 4
all placed two frets above the barre.
Example: B major barre chord
| String | Note | Finger | Fret |
|---|---|---|---|
| 6 | – | Muted | – |
| 5 | B | Index barre | 2 |
| 4 | F# | Pinky | 4 |
| 3 | B | Ring | 4 |
| 2 | D# | Middle | 4 |
| 1 | B | Index barre | 2 |
Common A-shape variations
| Chord type | Change from major shape | Example |
|---|---|---|
| Minor | Move inner shape closer to barre | Bm |
| Dominant 7 | Adjust upper notes | B7 |
| Major 7 | Add major 7th tone | Bmaj7 |
| Minor 7 | Minor shape with flattened 7th | Bm7 |
| Sus2 | Lift or alter 3rd | Bsus2 |
| Sus4 | Replace 3rd with 4th | Bsus4 |
Separate fingers vs mini-barre
You do not have to barre the higher strings with your ring finger just because some advanced players do. If using separate fingers gives you a cleaner chord with less tension, that is the better choice.
Technique should serve sound and comfort, not appearance.
How to find any barre chord on the neck
Once you know the two main shapes, finding chords becomes much easier.
- E-shape barre chords take their name from the note on the 6th string
- A-shape barre chords take their name from the note on the 5th string
That means if you know the notes along strings 5 and 6, you can find major and minor barre chords in every key.
For example:
- 6th string, 3rd fret = G -> E-shape there gives you G major
- 5th string, 3rd fret = C -> A-shape there gives you C major
This is one of the reasons barre chords are so powerful: they turn the fretboard into a logical map instead of a collection of isolated chord diagrams.
The most common barre chord mistakes
Most players do not fail because they are weak. They fail because they repeat a few fixable mistakes.
| Mistake | Why it happens | Quick fix |
|---|---|---|
| Pressing with the flat finger pad | Feels natural at first | Roll onto the bony edge |
| Bent index finger | Poor wrist angle or tension | Straighten finger and reset hand position |
| Squeezing too hard | Trying to overpower buzzing | Reduce force and improve placement |
| Barre too far from the fret | Inaccurate placement | Move just behind the fret wire |
| Thumb over the neck | Feels stronger but reduces leverage | Bring thumb behind the neck |
| Starting at fret 1 | Common but unnecessarily hard | Start around fret 5 |
| Building the whole chord too fast | Skips the foundation | Test the barre alone first |
| Muting adjacent strings accidentally | Finger crowding | Adjust fingertip angle and hand position |
| Expecting instant success | Unrealistic learning pace | Practise daily and track small improvements |
Step-by-step barre chord practice plan
The fastest way to improve is not random repetition. It is progressive practice.
Phase 1: isolate the barre
For the first several days, work only on the index finger.
- Place your index finger across all 6 strings at the 5th fret
- Roll to the bony edge
- Place the finger just behind the fret
- Position the thumb behind the neck
- Play one string at a time
If a string buzzes, do not squeeze harder. Instead, make one small correction at a time: angle, position, rotation, or thumb placement.
Once the 5th fret is clean, repeat at the 4th fret, then the 3rd.
Goal: a clean single-finger barre before adding chord shapes.
Phase 2: build the E-shape
Once the barre alone is reliable, start constructing the full E-shape.
- Barre first
- Check each string
- Add the middle finger
- Recheck
- Add the ring finger
- Recheck
- Add the pinky
- Strum the full chord slowly
Work at the 5th fret first, then gradually move down the neck.
A useful drill is to hold the shape for 10 seconds, release, shake out the hand, and repeat several times.
Phase 3: build the A-shape
Next, move to the A-shape barre system.
- Barre strings 1 to 5
- Mute the low E string
- Add the three fingers two frets up
- Test each string separately
- Correct buzzes by adjusting position, not pressure
Then alternate between E-shape and A-shape chords at similar fret positions to train flexibility.
Phase 4: strengthen endurance and control
Once you can form the shapes, the next step is making them sustainable.
Useful drills include:
- Isometric holds: light holds with good form, followed by full release
- Chord cycling: move one shape up and down the neck
- Shape switching: major to minor to dominant 7 at the same fret
- Progression work: practise real chord movement in time
This stage is where barre chords begin to feel musical rather than mechanical.
Phase 5: improve transitions and fluency
The final stage is integrating barre chords into real playing.
Practise:
- Open to barre changes such as E to F, or A to B
- Key-based progressions using both E-shape and A-shape forms
- Partial barres to improve control
- Rhythm patterns so the chords work inside actual songs
At this point, barre chords stop being an isolated skill and start becoming part of your normal playing vocabulary.
How to practise barre chords without pain
Barre chords can create fatigue, especially early on, but they should not cause sharp pain.
Normal discomfort vs warning signs
Normal:
- Mild muscle fatigue
- Temporary finger tenderness
- Gradual callus development
Not normal:
- Sharp pain
- Shooting pain
- Numbness
- Throbbing in the thumb or wrist
- Lingering pain after practice
If you feel the second group, stop and reset. Pushing through pain is not productive practice.
How to reduce strain
- Warm up first with gentle finger movement and a few open chords
- Take micro-breaks every few minutes
- Shake out the hand between attempts
- Keep the wrist neutral rather than sharply bent
- Use less force and better positioning
- Stop when technique collapses
Injury prevention matters here. Barre chords reward consistency, not punishment.
Could your guitar be making barre chords harder?
Yes. Sometimes the issue is not only technique.
A guitar that is difficult to play can slow barre chord progress dramatically.
Common setup problems
- High action: strings are too far above the fretboard
- Heavy strings: require more pressure than necessary for a beginner
- Old strings: can feel stiff and lifeless
- Poor neck setup: can make some frets harder to play cleanly
Beginner-friendly adjustments
- Try a lighter string gauge
- Make sure the guitar is properly set up
- If possible, learn some of the technique on an electric guitar, where lower string tension often makes barre chords easier
A better setup will not replace good technique, but it can remove unnecessary difficulty.
Barre chord troubleshooting
“My index finger hurts where the creases are”
You are probably pressing with the flat underside of the finger or placing the joints directly over the strings. Rotate toward the bony edge and shift the finger slightly.
“The middle strings always buzz”
This usually means the finger is bending at the middle joint or sitting too far from the fret wire. Straighten the finger and move closer to the fret.
“I can’t stretch far enough”
Start higher on the neck where the frets are closer together. Also check thumb placement, because a better thumb position often improves reach immediately.
“I have small hands”
That does not prevent clean barre chords. Good technique matters far more than hand size. Many players with smaller hands actually develop better leverage because they cannot rely on squeezing.
“It works at fret 5 but not at fret 1”
That is completely normal. Lower frets are harder because the string tension is higher and the fret spacing is wider. Master the easier positions first, then work downward.
Frequently asked questions about barre chords
How long does it take to learn barre chords?
With focused daily practice, many players see this kind of progress:
- 7 to 10 days: cleaner single-finger barres at easier frets
- 2 to 3 weeks: better E-shape and A-shape consistency
- 4 to 6 weeks: more reliable 1st-fret barre chords and smoother changes
- 2 to 3 months: solid comfort across the neck
Progress varies, but regular short sessions beat occasional marathon practice every time.
Do barre chords require strong hands?
Not in the way most people think. They require efficient pressure, leverage, and coordination more than brute strength.
Should beginners learn F major first?
Usually, no. It is one of the hardest places to start. A much better approach is beginning around the 5th fret and working down.
Can I avoid barre chords and still play guitar well?
You can delay them, but avoiding them limits your freedom. Barre chords are one of the key skills that let you transpose easily, move through different keys, and use the full neck with confidence.
Keep in mind : the real key to mastering barre chords
Barre chords are not a strength test. They are a technique test.
Once you understand that, progress becomes much more predictable. Instead of fighting the guitar, you start working with mechanics that actually make the chord easier.
The core ideas are simple:
- Barre first
- Use the bony edge of the index finger
- Keep the thumb behind the neck
- Use leverage, not a death grip
- Start higher on the fretboard and work down
- Practise consistently, not excessively
If you stick to that approach, barre chords stop feeling impossible and start feeling inevitable